🔍 Let’s start by understanding what is Docker?
Docker is a platform for building, running, and shipping applications which run and perform the same way everywhere else; just like the way it is supposed to work on the developer’s machine.
When a developer is building an application, it is not supposed to run only on his machine. Ultimately we want to move this to different environments; like QA for testing, may be move to Staging environment for some pre-production testing or for user acceptance testing, and then move to production environment where our end users will be using the application. That’s the end goal basically.
More often we come across applications not working the same way in all the environments. This can be because of several reasons, I am naming few of them here:
- One or more files are missing
- Software version mismatch
- Different configuration settings in different environments and mismatch between them
- Different operating system in the target environment
Well, now with the essence of Docker as a platform that you have, you can relate to how Docker can solve above problems. It will solve these problems by giving you the runtime that you need to run your application everywhere, be it development environment, or QA, or staging, or production. If it runs at one place, it is guaranteed to run at every other place, provided that you have Docker installed at those every other place.
While we are discussing on runtime environment, on the same note, we are aware that a developer needs to create that environment on the development machine so that he or she can start working. The developer would install MySQL, Java, Cassandra etc… and then tune these to the expected configuration values.
So much effort goes into it. Isn’t it?
Docker helps you ease off these pain points. You just provide a list of things that you need to prepare the runtime environment for your application, and Docker will make sure that all those are there for you.
It’s like you asking your friend, “hey this is the grocery list, get them for me; and after you have brought them, place them at these these places; and then you please boil two eggs for me.” And your friend does that for you. If you have a good friend, you can ask for even more, like may be ask to prepare sandwiches as well after the grocery is done.
That friend is Docker.
So why wait? Go ahead and install Docker on your local system. And once you are done, read on!
🔍 The Dockerfile
The ‘Dockerfile’ is the file, with no extension, that you will use to write steps for instructing the Docker Engine. The Docker engine reads through the steps mentioned in the Dockerfile, and uses that to prepare an image which we call as ‘Docker Image’.
So, if we revisit the grocery store example above, the Dockerfile is that piece of paper on which you prepare the list of items, and all other information on what your friend has to do.
🔍 The Docker Image
Docker Image is like a blue print, a packaged template plan, which will be used to create one or more real time instance of your runtime environment, called ‘Docker Container’.
You can relate Docker Image and the Docker Container something like this,
If Docker Image is a ‘class’, then Docker Containers are ‘instances’ of that class.
Cool Stuff! Isn’t it?
Docker images are comprised of several layers. Each instruction/step in your Dockerfile forms a layer in the image. When Docker Engine creates your container, it reads through the image file and performs its operation in layered approach.
Reads first instruction, executes that instruction… One layer done. Reads second instruction, executes that instruction… Second layer done.
So on, and so forth.
🔍 The Docker Container
Like I said above, Docker Containers are real time instances of the Docker Image. The Docker Container is an enclosure, an isolated environment, inside which your application will run. It will have all the necessary dependencies present along with configuration for your application to run.
Docker packages all the perquisites required for your application like operating system, libraries etc. and create a runtime environment in the docker container for our application.
All this is done by issuing a single docker command.
To summarize the discussion we did so far, as a developer you will:
- Install Docker on your machine
- Write a Dockerfile which will have necessary instructions to Docker Engine
- Issue a command to start building the image from Docker file. (Hey Docker! Go ahead and build an image for me using this Dockerfile)
- Issue a command to start the docker container. (Hey Docker! I saw you created the image. Now run this image)
There are lots of commands in Docker CLI, through which we ask Docker Engine to do stuffs for us. I want to show handful number of those commands to you. But a bit later. Please bear with me.
🔍 Docker Container vs Virtual Machines(VM)
Dockerized Application run in Docker Container, which is an isolated environment from the host machine.
Virtual Machines also provide us an isolated environment to run our application with all the libraries and configurations.
But Docker is different from Virtual Machine.
Virtual Machines are an abstraction of a physical hardware machine, built over the Hypervisor.
Hypervisors manage Virtual Machines.
With Virtual Machines:
- Each VM needs a full-blown OS. If these OS are licensed, then just think of the associated overall cost.
- These are slow to start.
- These are very resource intensive. They take up certain percentage of the physical hardware associated with your host machine. For example, if you have two virtual machines running, then your physical RAM and CPU gets divided among those two VMs, after setting aside some of these resources for the host machine to run itself.
With Docker:
- Docker as a platform is installed just like any other application on your host operating system. It will then work as a service in the background on your operating system.
- Containers give us isolation, but they are lightweight.
- They don’t need a full blown OS, instead they make use of OS on the host. A Linux container requires a Linux kernel on the host. A Windows container requires a windows kernel.
- Need less hardware resources.
- They start quickly.
- Docker containers are meant to run the application or a service. Unlike Virtual Machine, they are not meant to host an operating system altogether. Once the service or application running inside the container crashes or stops, the container stops as well.
🔍 Docker Architecture
The Docker as a platform is comprised of Client Server Architecture. It is installed on a host machine, running Linux/Windows kernel. Client component talks to Server Component, called as Docker Engine. The communication between the client and server component happens over REST APIs, over UNIX sockets or a network interface.
The Docker Engine has a long-running daemon process, ‘dockerd’. dockerd keeps listening to the commands issued, and executes them.
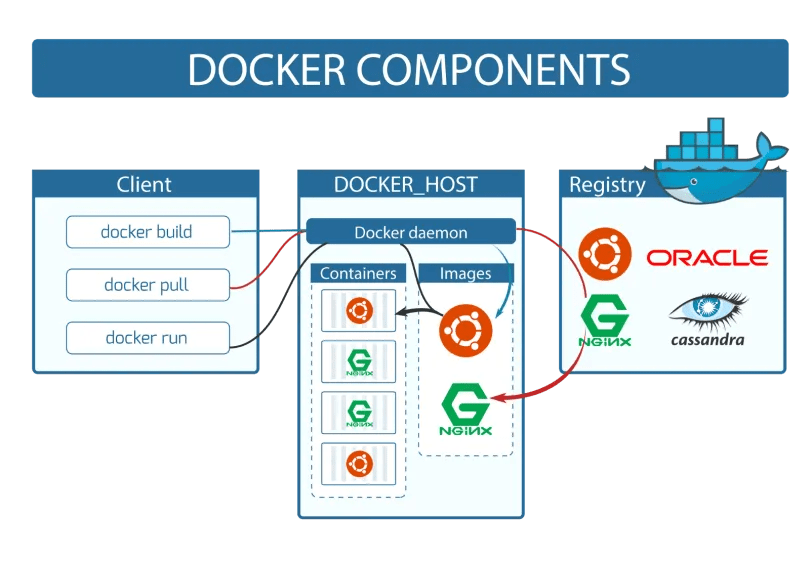
Docker client and the docker daemon can run on the same host or can run on different hosts and communicate through sockets or a Restful API.
As shown in the diagram, we issue commands at Client side, using the CLI.
Registry is like ‘Github’ for Docker Images. We pull a docker image from or push a docker image to Docker Registry. Docker provides a public registry for us, called Docker Hub, where base images from most of the vendors are available. On top of that base image, we can start building our own image.
📍 A Handful of Docker Commands
I deliberately delayed Docker Commands. I have seen people jumping to docker commands directly without understanding the bare minimum concept behind docker.
Now, if you have read through the concepts so far that I discussed, let’s see some docker commands that we can execute in docker CLI.
run- start a container.
This command starts a container using a Docker Image. In case the image doesn’t exist in local, docker will pull this image from Docker Hub and then run the container for us.
You can use tag, after the semicolon in the image name, to run a particular version.
eg:
docker run nginx:5.2
Use -i flag to run in the interactive mode. You can club this with -t flag as well to attach a pseudo terminal.
eg:
docker run java-program-image:latest -it
While running your docker image with docker run, if you haven’t provided the container name then docker will use a default container name for it. But in case you want to name a container, then you can do like below using –name flag.
docker run --name bumbler-java java-program-image:latest
Port mapping can be achieved by using -p flag. It tells at what port of the host, the container’s port will be accessible.
eg:
docker run -p 8705:8705 java-program
Using docker run, it runs in attached mode. This means, the container will be running in the foreground. You would need to press Ctrl + C to stop the continuous logs, which will also stop the container. If you want to run in background in detached mode, then use the -d flag.
eg:
docker run -d nginx
If you want to get a detached container to attached mode, then we can do using ‘attach’.
eg:
docker attach <container_id>
ps- lists running containers. Use -a to see all container, running as well as stopped containers
eg:
docker ps
docker ps -a
stop- stops a running container.
eg:
docker stop silly_sammet
rm- remove a stopped container
eg:
docker rm silly_sammet
images- List images
eg:
docker images
rmi- Remove images which are no longer required
eg:
docker rmi nginx
We would need to remove all the dependent images before we can delete this image.
pull- download an image, and not run it
eg:
docker pull nginx
exec- execute a command inside the container
eg:
docker exec container_name cat /etc/hosts
This command will print the content of hosts file present in the container.
environment variables (-e, –env, –env-file) - Use the -e, –env, and –env-file flags to set environment variables in the container you are running, or overwrite variables that are defined in the Dockerfile of the image.
eg:
docker run -e MYVAR1=bar --env MYVAR2=foo --env-file ./env.list ubuntu bash
The next section in this article tries to containerize a simple Java program. I will try to cover few more concepts as part of that example. But before going to that section, I urge you to pull an image from docker hub and run in your local. Concepts, and the commands we discussed so far are enough to help you with this.
So what I expect you to do is:
- Pull hello-world image from docker hub
- Run this image in a container whose container should be named as ‘bumbler-container’
- The container’s port 1234 should be exposed to host machine at port 7890.
If you were able to run this, then please comment the output you got in comments section of this article.
📍 Containerizing a Java Application Demo
I have a simple Java class, which greets the user with Hello. I want to containerize it; ie this Java program should run inside docker container.
Let’s have a look on the Java program
package dev.bumbler;

public class JavaDockerDemo {

    public static void main(String[] args) {
        System.out.println("Hello " +  System.getenv("user") + "!");
    }
}
The program will take the name of the user from environment variable, and will print ‘Hello ${user}’, where ${user} will be filled with the user’s name.
If you notice closely, I have used a package for this class. When I will write the Dockerfile I need to ensure that the package structure is also addressed in my instruction.
Okay, let’s create the Dockerfile.
# Start with a base image containing Java runtime
FROM openjdk:17

# Setting an environment variable with a default value
ENV user user

# creating a new directory inside container
RUN mkdir /var/java-docker-demo/

# Copying contents inside the src folder to our newly created directory inside container
COPY /src/ /var/java-docker-demo/

# setting work directory for the docker RUN/CMD/ENTRYPOINT commands
WORKDIR /var/java-docker-demo/

# At the time of building the image, asking docker to compile the Java file as well
RUN javac dev/bumbler/JavaDockerDemo.java

# Instructing docker to run the program when I start the container
ENTRYPOINT ["java", "dev/bumbler/JavaDockerDemo"]
Each of the instruction in the Dockerfile will form a layer while building the image.
I have used openjdk:17 as the base image. Docker will go and fetch this image from Docker Hub. On top of this image, we are instructing the Docker what to do next.
Comments that I have mentioned on each instruction is kind of self explanatory, and I hope they explain you why I used them. But I will explain few of them.
The RUN takes the command that we want to run at the time of building the image. This will not be executed at the time of starting the container.
ENTRYPOINT executes the command when container is starting. That is why I used java file run command in ENTRYPOINT.
We can also use CMD to execute our command when container starts. If you have more than one CMD, then only the last CMD command will be executed.
ENV initializes an environment variable. In case we do not provide any argument at the time of starting the container, then the default will be used; which is ‘user’ here in this case. You can also do the same thing using ARG. But then, this variable will be accessible at the time of building the image only. With ENV, we have this value available at the time of building the image, as well as at the time of running the container.
We build this image using the command from the CLI:
docker build . -t java-docker-demo
Docker will show us below in the CLI logs output:
Sending build context to Docker daemon  36.86kB
Step 1/7 : FROM openjdk:17
17: Pulling from library/openjdk
e4430e06691f: Pull complete
99ce5342b806: Pull complete
603e156f2a3d: Pull complete
Digest: sha256:3d88de143bdd54d3e873302355564818e0ac0d17dbacc9869090197b7dd8a8f3
Status: Downloaded newer image for openjdk:17
 ---> 34aba91dbd13
Step 2/7 : ENV user user
 ---> Running in b6c63f968b4d
Removing intermediate container b6c63f968b4d
 ---> 338685f87805
Step 3/7 : RUN mkdir /var/java-docker-demo/
 ---> Running in dee95735538c
Removing intermediate container dee95735538c
 ---> 4cc8ad362972
Step 4/7 : COPY /src/ /var/java-docker-demo/
 ---> 784de505e733
Step 5/7 : WORKDIR /var/java-docker-demo/
 ---> Running in 105585b3a226
Removing intermediate container 105585b3a226
 ---> 7032efa086e5
Step 6/7 : RUN javac dev/bumbler/JavaDockerDemo.java
 ---> Running in 1693d31fdb81
Removing intermediate container 1693d31fdb81
 ---> 2cf1e43cfeaf
Step 7/7 : ENTRYPOINT ["java", "dev/bumbler/JavaDockerDemo"]
 ---> Running in 4aa6afeaa459
Removing intermediate container 4aa6afeaa459
 ---> 206edabe9cb5
Successfully built 206edabe9cb5
Successfully tagged java-docker-demo:latest
I didn’t have the openjdk image in my local. That is why it was fetched from the registry. Notice how our instructions from the Dockerfile are getting executed in steps, one after the another, in a layered way.
Now our image java-docker-demo is ready. Next, I will run this image on the container.
docker run --name java-docker-demo-container java-docker-demo
It prints ‘Hello user!’. We have not passed the value for environment variable. Next, I will run this by providing environment variable using -e flag.
docker run --name java-docker-demo-container -e user=Bumbler java-docker-demo
I passed the user value as Bumbler. Let’s see the output.
Output:
Hello Bumbler!
🪄 Conclusion
I hope this post gave you an idea on Docker, and will help you to quickly start working with it. Once you are comfortable with these concepts, you might want to start with Docker Compose. It helps you define, manage and share multi-container applications which are supposed to work together.
All the code changes I used in this article are present at my Github repository. Do not forget to checkout.